SURE SHOTS MAGAZINE

  ARCHIVE - ISSUE FIVE- JAN  2014                                  COVER  -  FEATURED PICTORIAL  -   LIFESTYLE  -  TRAINING                      ARCHIVE - ISSUE FIVE- JAN  2014  

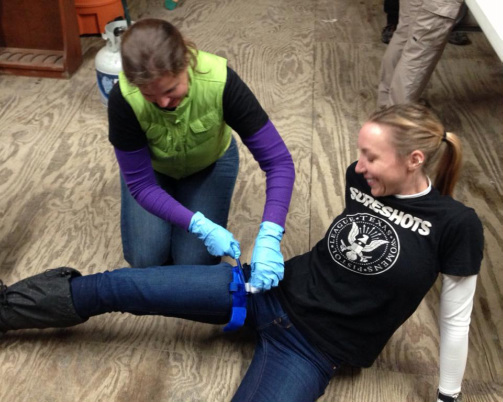
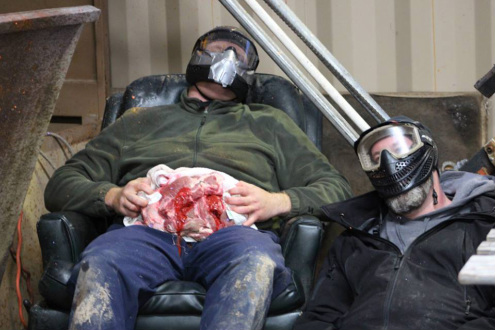
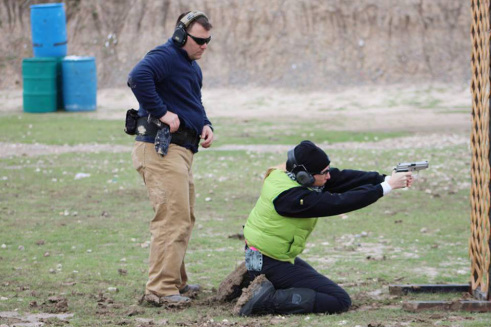
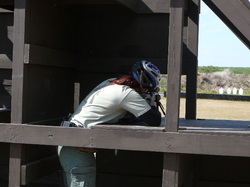
Two-day Critical Care First Aid Concepts, Advanced Handgun by NOLATAC Firearms Training and Combative Weapon Solutions 
 Review

Picture
Sure Shot Katie saves Niki from bleeding out
When it came to the world of first aid for a critical incident, I'll be the first to admit I was a textbook case of 'I didn't know how much I didn't know'. At Sure Shots practices, training events, and range days, I made sure there was always someone well-trained in trauma first aid present, but I never really thought outside the realm of the shooting environment. More specifically, I never considered that I'd be more likely to be involved in or witness a critical accident off the gun range than on it.

I was lucky enough to be invited to participate in a two-day "First Aid/Trauma Management Advanced Pistol Course" presented by New Orleans-based firearms training company NOLATAC and Austin-based Combative Weapons Solutions. 

Brannon LeBouef of NOLATAC is a United States Marine Corps veteran with a long resume of firearms training, both in the military and privately in the U.S. and abroad. He is currently a law enforcement officer in Louisiana. I knew he had a great reputation in the firearms training community, and I was very happy when my friends at High Speed Gear made the introduction. Lee Vernon of Combative Weapons Solutions is an Austin-based firearms trainer as well as a Certified Firefighter/EMT with over 20 years of experience. I couldn't have hoped for better experts in their fields, so I excitedly packed my warmest clothes and gear and headed to Houston for the weekend. 

On Day One of the course, fellow Sure Shot Katie and I were up early, grabbed our Starbucks, and headed out to the sticks of Hempstead, TX. It was freezing and raining, and we were glad that this day would consist solely of classroom instruction. Lee began the course talking about different kinds of trauma, and how to assess and treat each one. A very large portion of the class focused on stopping someone from bleeding out through the proper use of a tourniquet. When questioned by one of the students, Lee immediately debunked the myth that the use of a tourniquet would result in the loss of a limb. Throughout the day, we learned methods to control bleeding—direct pressure, wound packing, pressure dressing, hemostatic agents, and tourniquet application. We also learned how to aid in opening airways, and how to treat chest wounds using occlusive devices. Lee was a fantastic instructor; he delivered the information in a very understandable way, with Brannon interjecting with real-life examples of scenarios. They made a great team!

Then we got to put it all into practice, using side of beef that had been shot and stabbed (which was pretty cool!), dummies, and each other. Before the practice part, the information had seemed a bit overwhelming to me, but by the end of the day, I was surprised by how much I had learned. 

PictureTrauma Training, Texas Chainsaw Massacre style
Day Two was even more freezing and rainy. After a briefing in the classroom, we headed out to a tactical bay, this time with Brannon in the lead and Lee coaching on the line. We spent the first part of the day building on the techniques of one-handed shooting, reloading, malfunction-clearing, shooting from cover, and actively scanning for threats. Then we added the application of tourniquets to ourselves and others while being timed. In the driving, freezing rain, we engaged our threats, found cover, treated our wounds, and got "back in the fight". I was truly impressed with how well everyone did, which is a testament to the effectiveness of both instructors. Freezing hands, wet guns, slippery tourniquets, and thick mud everywhere added additional obstacles to overcome, and I'm a big believer that training in extreme conditions, though uncomfortable at the time, provides additional benefits to the students.

The second part of the day is when the training REALLY ramped up! With the use of simunitions, we each had to enter an active-shooter scenario where there were already multiple gunshot victims. While dealing with the shooter firing at us, we had to find cover, assess the victims and treat them if necessary, all while simultaneously stopping the threat. We were staged inside the classroom, and had no idea what the scenario would be once we walked out onto the porch, where Brannon and Lee changed it up for each student. Using other students as victims, they made sure it was as realistic as possible, even having the victims yelling in pain, while Brannon, the active shooter, engaged from a different spot each time. 

I had never done any force-on-force training before this course. Needless to say, it really elevates the stress factor! For years, Sure Shots have discussed Defensive Mindset and what could happen during a real-life active-shooting scenario, but I never really grasped how stressful and disorienting it is when someone is firing at you—even when you know they're just simunitions! Plus, this time there was the added element of  victims, as well as most of the time not being able to see where the shooter was. It was extremely eye-opening, and I realized that the adrenaline dump I got from this training was nowhere near what it would be in a true-life scenario. 

Picture


The things I took away from this course were huge:

1. I now have the skills to save a life. Confidently and correctly. That's huge. I now roll with two tourniquets in my car (because "one is none, and two is one"). 

2. Every scenario is different and there is no way to prepare for the specifics, but you can absolutely prepare by training with techniques and mindset. Practice shooting and manipulations in every possible combination of weak hand/strong hand/from the ground, from cover, in the rain, in the cold, in the dark, etc.

3. The best tactical medicine is NEUTRALIZE THE THREAT OR ESCAPE THE SITUATION!

Reviewed by Niki Jones

THUNDERWEAR (that's fun to wear!) 
Review

Picture
As I’ve been on the search for appropriate holsters for conceal carry, I (like many of you) have been bombarded and overwhelmed with the possibilities. I read reviews on the pros and cons of different types, but found few reviews that explained the thought process behind holster selection. There are LOTS of great holsters to choose from, but my concern is what will work best for me in my daily life. I had two main considerations to address: lifestyle and body type.

I spend most of my time chasing after/carrying/playing with my adorable (and incorrigible!) toddler. He’s quick and determined, so I am usually in comfortable clothes during the week. Yoga pants, cargo shorts, and jeans with t-shirts and tank tops make up the bulk of my wardrobe during the week. Not a lot of layers to work with, and I really have to think about where I can safely and comfortably conceal my 9mm Shield with a little one climbing on me all day long.

The other consideration for me is my body type. Can I be real for a second? I am not built like your average model. Never have been, never will be! Most of the women in holster advertisements pictures were TINY, God bless them. I love tiny people, but I’m not one of them! So for those of us who aren’t, here is some real talk so you can gauge what’s right for you. I’m tall - about 5’9”, and very long legged. Though I’m “average” size (whatever that means), I am larger-boned and curvy. I’m also very short-waisted, so concealing can be difficult around my abdomen since I already have to slide the waistbands of my pants toward my hips so I’m not rocking my waistband at my bra line.

Because of my body type, IWB (Inside Waist Band) can be a problem (for me) even with a women’s holster that sits lower because I simply have no abdominal space in which to conceal ANYTHING. I still carry IWB if my outfit allows, but I can’t always manage it without printing (especially with a toddler on my hip half of the time). OWB (Outside Waist Band) doesn’t often work for me because I rarely have layers to help cover.

I’ve asked many people about their preferred carry position/holster, but hadn’t heard about Thunderwear until a family member mentioned it. He actually asked me to find his gun (which I couldn’t), and then showed me what Thunderwear is all about. It’s a fabulous idea! But would it work for me? Women’s pants aren’t constructed with as much room in the… ahem… zipper area, so would there be enough space to conceal in, say, my Apple Bottom jeans? I decided to give it a try!

I ordered my Thunderwear (size M) from The Well Armed Women website, and was pleasantly surprised right off the bat by the comfortable, soft fabric and the solid construction. The seams are strong and well sewed, there are no uncomfortable ridges that irritate the skin after all-day use, and the band has a long strip of thick Velcro that is adjustable so you can adapt it to fit your body.

The description on the Thunderwear website suggests that one of the two pouches be used to hold an extra mag, but they’re the same size, so you can use your dominant hand, regardless if you’re a lefty or righty. Or, you could conceal your primary and your back up pistols in the same holster, but you’d need some serious room in the waistband for that and may not want “all of your eggs in one basket,” as my Grandma used to say. My 9mm Shield fits well in either pouch, and I can fit up to two loaded mags in the other pouch, though I noticed more printing with two mags. Depending on the rise and waistband of my pants, the grip of my pistol sits either just out of sight or slightly above my waistband.

While it took a bit of adjustment time for me to feel comfortable with wearing my pistol in the Thunderwear, I was pleasantly surprised at how well it worked for me. I’ve worn it almost all of my waking hours for almost a week straight, and only really notice it’s there when I sit down or walk up stairs (but I’m still comfortable!). Be aware that because Thunderwear is soft-sided, you can conceal different guns in the holster, but it won’t mold to your gun like Kydex. So if you have to re-holster, you’re going to need two hands.

There is really only one thing that I don’t love: the high-quality Velcro likes to find something to stick to (shocking, I know). That means that if you’re wearing a finer material (lace, silk) and it gets near the exposed Velcro in the lower back region, it’s going to snag. The only way I’ve found to work around this is to cover that Velcro with a compatible fabric once I’ve adjusted the band. I’m sure a more creative person can come up with a better solution, but that’s the best I could quickly come up with.

My Thunderwear is my go-to holster for daily wear at this point, and I’m glad I found it! It’s very adaptable, amazingly comfortable, very reasonably priced, and it’s versatility works well with both my lifestyle and body type. Two thumbs up for the Thunderwear Pistol Pouch from The Well Armed Woman!

Reviewed by Sarah Hernandez

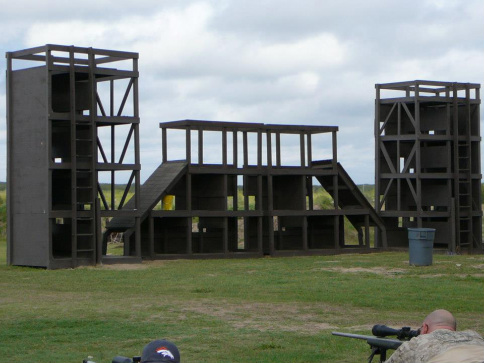
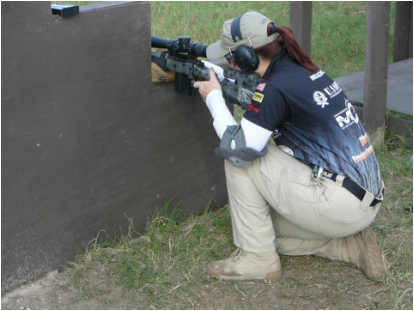
Week-long Precision Rifle 1 & 2 Combo Course 
by Rifles Only Review

Picture
The RIFLES ONLY training facility, in the Wild Horse Desert area of South Texas
Ever have an “aha” moment while training? How about 40 of them? This past September I had the opportunity to take a week long Precision Rifle 1 & 2 Combo course offered by Rifles Only in Kingsville, TX. To say I was excited is an understatement. I've never had any formal rifle training, so I was prepared to learn as much as I possibly could. My husband, who is a firearms instructor and Deputy Sheriff, took the class with me figuring we could both share things the other might've missed. 

We arrived at Rifles Only with a ton of gear. Following a list of suggested supplies to bring, I had my Remington 700 .308 with me along with 500 rounds of ammunition, my backpack, three magazines, a data book, a couple of pens, two slings, a shemagh, and sunscreen. The class size was small (they try to keep this course limited to around 12 students), so we knew we were in for some individualized attention. Jacob Bynum, the lead instructor and owner of Rifles Only started the class with some introductions and we were off. Jacob and his co-instructor, Johnny Primo, asked each of us to load five rounds in a magazine and meet them on a raised deck to shoot a 5-shot group at around 100 yards. While watching each of the other students shoot, I was noticing a pattern. Almost every one of us canted slightly off of our rifles. Our attempt to get comfortable behind our rifles was doing us a disservice however because most of our groups sucked. Back to the classroom where we would hear why. 

Turns out not one of us was concerned with our body position other than to be comfortable. I learned some new terms that morning that are all based in the fundamentals of marksmanship. Not having the correct natural point of aim and sight picture will affect your shot. This was something I’d never given much thought to in the past. Most of us were also not paying attention to our breathing and were pulling, and sometimes slapping, the trigger while we held our breath or held our exhale or held somewhere in between. This definitely wasn't helping in the consistency department. Jacob and Primo showed us the importance of being straight behind our rifles while loading the bipod. Both of these help drive the rifle through recoil making it much easier to observe an impact. Having the same position consistently made the shots that much more predictable. 


PictureRegina's got this covered
Now I'd heard that having your trigger finger aligned at a 90 degree angle would help a shooter be consistent and much more accurate. I wasn't doing it, but I'd heard of it prior to the class. The biggest lesson that morning was that my rifle, your rifle, anyone's rifle, doesn't give a hoot if you're comfortable behind it. It's a machine designed for one purpose and that purpose has nothing to do with your comfort level. On that note, we were back out to the range to practice our body alignment, natural point of aim, and natural respiratory pause (that breathing thing). As a class, we dry fired our little hearts out. I spent a good portion of that day watching my reticle, trying to get the best position possible so it would not bounce when I pressed the trigger. It all felt completely unnatural, but my shots were going where I wanted them to go once I started live firing. For me, it was like hitting a reset button on my rifle shooting. Learning how to position myself correctly would take some practice but I was up to the challenge! The class shot some more groups that afternoon, working on getting the best group we could on an 1.25" dot. 

After we started to understand and apply the fundamentals we were learning, Jacob threw a curveball and made us all do the same drill support side. It's exactly what it sounds like. The rifle stock is in your support side shoulder. Using your support side eye in your scope, you practice with your support side trigger finger. The competition shooters in the class had shot support side before, but for the others in the class, this might have been the first time shooting this way. Support side shooting is something most shooters don’t practice a lot. It was harder for me to get my body position correct for the support side shots but once I did, it actually felt more “correct” than what I had been doing in the past. For the record, I believe I shot a better group right-handed (support side for me) than I did left-handed. Crazy.


Picture
Over the course of the week long class, we used several different types of props. Barricades were one of them. Barricades normally have at least three positions. One tier on the barricade is usually low-kneeling or sitting, another is kneeling or low-leaning, and one is standing. I learned that I have a tendency to blade off, or stand canted to the target, when I shoot off of barricades instead of using the barricade to help stabilize my sight picture. This would be another lesson proving that my rifle still doesn’t care about my comfort level.  When I applied the same fundamentals that I was using when prone, and got straight behind my rifle, I had a much better sight picture and was able to call my shots a lot more consistently. I was definitely starting to feel a lot more confident when almost all of my shots hit the Shoot-N-C on my target board. No reason to let the strong side have all the fun so we also shot those barricades support side. Support side shooting was quickly becoming my favorite twist to this class. 

One of the most difficult props in a competition for me are movers. Don't get me wrong, they're also one of my favorites, but I think that might be because I find them so challenging. There are many different approaches overheard at competitions about how to figure out a lead on a mover. Unlike pistol shooting, most rifle movers are shot at distance and require the shooter to hold a “lead” in front of, or in some cases, behind the moving target. I knew there was a bit of a science to it, but I figured whatever anyone else was using for a lead would also work for me. Not so. Your own response time needs to be figured into the equation. We started on the hardest of them all: the 100 yard paper mover. It might be running at the same speed when the shooter is at 100 yards or 550 yards, but it sure does look like it's going faster when you're down behind a rifle at a closer distance. Each of us was allowed one shot holding 1.5 mils (a unit of measurement in our rifle scopes that would be just a little more than 5 inches) in front of the target. We could either ambush (wait for the target to be 1.5 mils behind our cross hairs), or track (leading the target while in motion that same 1.5 mils). With that one shot, we were able to figure out what our actual lead was so we could apply it for the rest of the lesson. One guy was so quick he barely had any lead while another had to hold 2 mils in front. 

Picture
Did you know that your natural point of aim is important when shooting positionally?? Me either! Well, I probably did know, but not consciously. Our class got into a kneeling position, looked through our rifle scopes at our target, then closed our eyes and got as comfortable as you can be while being incredibly uncomfortable, and opened our eyes. I had to move. Just a little bit, but that tiny little bit saved me extra energy because I wasn’t muscling my rifle before taking shots. I could understand some of my misses in the past on kneeling shots. Having our natural point of aim aligned with the target meant a lot less fighting with our rifles through recoil to get them back on target.  

Rifles Only has a multi-level tower where you can shoot in a couple of different directions. The day we shot from the tower, it was windy. Perfect to gather DOPE (data on previous engagement) at distance. Each student had two shots at a target before the next classmate took their turn. If you didn't hit on the first round, you'd better be doing something drastic to change the outcome on the second shot, especially if you missed seeing where your bullet impacted. This was a great place to practice reading what the wind was doing. 

Wind reading, to me, is an art form. Arizona, where I live, doesn’t get much more than a 5 mph consistent breeze, so when the wind picks up at other ranges, I’m usually making a wild guess on what it’s doing. Do you trust the wind you feel on your face? What about the wind you see at the target or between the shooter and the target? Do you dial the windage knob on your scope to compensate for your wind guesstimate or do you hold? What is mirage anyway? I’d read quite a bit on all of these topics over the last couple of years prior to this class and came in more confused than ever about wind calling. I know that from now on, I’ll hold rather than dial for wind because conditions change frequently and from shot to shot. If I’m wrong on my wind call, but I’m following the fundamentals covered in this course, I’ll be able to see where I hit and make a correction quickly. Experience with different conditions seems to be the best way to learn what to do when shooting on a windy day. 

On the final day, we had a little competition. We ran through all of the things we’d practiced over the course of the week but for a score this time. We started shooting at 100 yards for a couple of courses of fire. Now we were warmed up! Off to 400 yards for a kneeling stage. 

Jacob and Primo had both gone over the importance of religiously following a pre-shot and post-shot checklist every time you shoot your rifle. Each time you get behind your rifle you should be checking off a list of things like target identification, what’s the range to the target, what’s the wind doing and will it affect your shot, and the fundamentals of marksmanship. When you’re done shooting the first thing you should do it reset your scope to zero. Pretty simple, right? Dial your DOPE before you shoot; take the DOPE off when you’re done. These are standard pre- and post-shot checklist items but I’ve witnessed many shooters forget to do one or more of them and have done the same myself in the past. 

The reason I mention the pre- and post-shot checklist is this: I forgot to dial my 400 yard DOPE on the kneeling stage. I was so focused on making sure my natural point of aim was on that I’d forgotten to do something fundamental. I ended up owing Jacob and Primo several cases of beer over that faux pas as they have a rule about forgetting the basics that involves a case of beer for each shot taken before you figure out what you did wrong. This mistake drove home the importance of having a checklist that is followed the exact same way every time. While it’s nice to prep for the upcoming event, skipping steps only ends up negatively affecting the shooter in question. 

After the kneeling stage, we moved on to the tower for a chaos drill. Targets, including a mover, are positioned in different spots around the range. You have a predetermined amount of time to complete the course of fire using only your reticle for your adjustments. We call these hold over and hold under drills. In a national level competition you’d probably have the option to dial, but you’d run out of time  before completing the course of fire. Plus, Rifles Only is a training facility that caters mostly to military and law enforcement, so they don’t want you coming off your rifle until the threat has been neutralized and honestly, it’s quicker to hold on larger targets. 

After a couple more shots off the tower, we moved to one of my favorite props of all time, the mouse/rat trap combo. Now this thing is intimidating. It’s got port holes all over it, a ladder, and just enough room to move from one level to another. Because of the way it was designed, the shooter is forced to switch between strong side and support side shots. Each of us had a target with a 2” Shoot-N-C and our shooter number clearly marked. I really wish that stage was a carnival ride that I could buy tickets for, that’s how much I like the challenge. I finished the stage in time with 16 hits out of 20 shots taken on my dot. 

I didn’t win the competition that day (that honor went to my husband), but I learned a ton! It’s one thing to shoot with no stress, taking your time with every shot. It’s an entirely different beast when a timer is involved. After we were done shooting, Jacob had us all meet back in the classroom to discuss areas for each of us to improve upon. We were all given homework for the future. He had some very specific advice for me that I’ll be working on as well as some words of encouragement. 

So, would I recommend this class to others? Absolutely! This is THE class I wish I’d taken shortly after picking up a rifle and it’s definitely a class I’d take again in the future. For those who are interested, Rifles Only offers this course and many more throughout the year. You can check out their courses at www.riflesonly.com. They have classes open to civilians (as well as military/law enforcement) that cover several different disciplines including carbine, pistol, helicopter assault, high angle shooting, team tactics, as well as several courses specific to precision rifle. Not all of their classes are restricted to their facility in Kingsville either. They have offered courses in Michigan, Colorado, and California in the past. If you’re interested in precision rifle shooting but would like a non-threatening introduction first, they also have instructional DVD’s available on their website that cover the fundamentals and field positions. I watch the DVD’s about once a month, so I’d highly recommend purchasing them as an introduction to Rifles Only and the art of precision rifle shooting.

Reviewed by Regina Milkovich


Flashbang!
Bra Holster 
Review

Let me just start off by saying that it can be challenging to find the right holster. So many options, yet so many variables to take into account for a woman to conceal carry. For instance, for me, where I carry is not an option—I HAVE to carry on my person. 

Let me paint a picture. Here I am, all 5'2" of me, trying to juggle 5 children, a really full Costco cart, my purse (read: diaper bag), trying to stay alert to my surroundings, etc. FIRST, I put my purse and babies in the car. I can't leave my bag in the cart while I'm distracted buckling carseats, that would be foolish. Once everyone is in, I begin the loading game. Filling my car full of all that stuff I just Ironman'd out of Costco. Now.... I'm busy. Rearranging the stroller so the chicken and eggs will "Tetris" in with the milk and flats of water. Not to mention the 10 other, oddly large random things I picked up. Got the picture? Now, a man walks up... WHERE IS MY CC??? Oh! I know! It's in the CAR! Doh! Not exactly a good scenario. This is a situation that I never want to be in. 

Picture
I've been looking at all kinds of holsters. At first, I figured an inside-the-waistband (IWB) would be the best for me as far is concealability. There are a lot of great companies that make IWB holsters, and my pistol fits and conceals well in a pair of jeans. I carry a Sig P938. It's a healthy sized carry gun and it is a good weight. I like the IWB… UNTIL I stick my kiddo on my hip. Then, yep... there it is! Printing. If my kids aren't kicking it or fiddling with it with their fingers, they're exposing it! After looking at a lot of options I decided to try the Flashbang. When I first heard of this holster, I won't lie, I thought it was gimmicky. I definitely didn't think that on my short frame it could conceal my P938. But, I started hearing good things about it and lately I've been struggling with conceal carrying because of all my unique needs. 

So, my sweet husband got me the Flashbang as part of my Christmas gift. I can not sing its praises enough! It allows my Sig to be completely concealed. I can wear a fitted tank and you can not see my firearm (really, I can wear anything but a dress). It is very comfortable, to the point that I could almost forget it's there (but I won't). I'm not worried that someone will accidentally feel it if they go to hug me, and my kids don't know it's on me. 

Now, comfort and concealability aside, the Flashbang design and placement lends to an extremely fast draw. Everything is right in front. No big sweeping movements are necessary. There is almost no way I could be grabbed by someone and not be able to get to my pistol. I would say it's pretty similar to an appendix carry as far as the motion but all you need to do is pull straight down. Cons? I haven't discovered any yet! It is possible that this may not work as well on smaller-chested women, but for me it's perfect! It is well worth the cost, very comfortable, super quick draw and fully concealed. I highly recommend the Flashbang.

Reviewed by Tegan Puran

Picture

Copyright © 2012-2018  
SURE SHOTS MAGAZINE